I began making cheese in earnest in May 2018. I have always had an interest in cheese but had rarely been inclined to be adventurous in the types of cheese I would try. I’ve come a long way since then! My first experience in the making of cheeses came by way of Graham Redhead’s 3-day Cheesemaking Workshopwhich I and my partner Christine attended in July 2006. Unfortunately, many things conspired to prevent me from any subsequent cheesemaking, not the least of which was time!
The first cheese I made alone was a Camembert. I was, as you’d expect, quite nervous about the process, however I found the experience to be rewarding and exciting. Much to my surprise and delight, the Camembert was everything I hoped for, nice earthy flavour and aroma with the paste just as I like it.
I have since made many batches of Camembert and to date have had only one failure. I tried to make a CamBlu by making my own modifications to my original Camembert recipe. Unfortunately, I had to feed that one to the bin monster! But I suppose you sometimes need to be philosophical when making cheese and just treat failures as a learning experience.
Following are some of the cheese I have made since May 2018. I try to make cheese a couple of times a month but lately I have been having issues with obtaining good quality milk. I think the drought may be a factor.
- Cheddar – Cloth bound and aged for 12 months. Tasted at 6 months and it was a little underwhelming. After 12 months it was very nice.
- Camembert – I have made many Camembert over the past 18 months or so as they are very popular with friends and family. From 16 litres of unhomogenised milk, I usually yield 5 x 220 – 250 gram wheels. I have also experimented with the cultures I use but usually only use M235 and TPM2 (plus GEO17 and Penicillium Candidum of course).

- Camembert
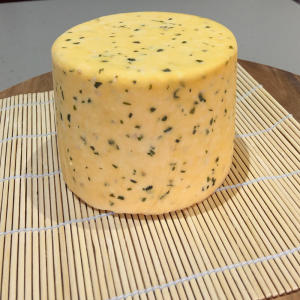
- Stilton
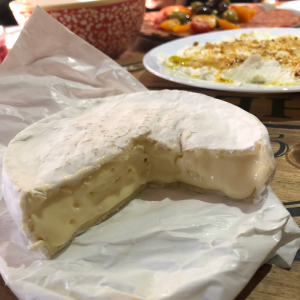
- Double Brie – Made only once as I prefer Camembert.
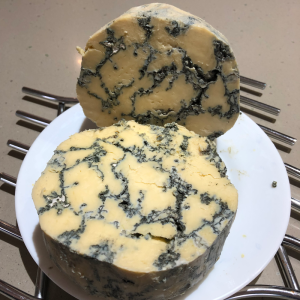
- Stilton – I don’t like Blue Cheese myself, but my partner Christine does so I decided to give it a crack. I used a less intense Blue Mould Spore (PR1) so as to produce a “gentler” Blue flavour. Although not entirely authentic due to there being no real rind production and that the Blue Veins didn’t radiate from the centre of the cheese, it was very well received. From all accounts the Blue flavour was good and the cheese itself was soft, creamy and sweet.
- Parmesan – To date I have only made one 800 gram wheel which will have been aged for 12 months in late January 2020. I tried it at 9 months and whilst the flavour is very good, it is possibly too dry and hard. I believe this was caused by three things, I used milk with too low of a fat content, I left it too long before oiling the rind and the humidity levels in the thermoelectric fridge I aged it in where far too low. Next time I will use a ripening box that will be easier to maintain a consistently high humidity. In order to compare flavour and texture, I will also make two larger wheels from the same batch and will either wax or vacuum seal the second cheese.
- Colby – I have made two Colby cheeses to date, the first was a little too moist and a little bitter for my liking (we ate it earlyish at 6 weeks). The next Colby (2kg wheel) was flavoured with liquid smoke and aged for 3 months. I also reduced the amount of rennet to the bare minimum. This cheese was very good and with only a light smoke flavour, very enjoyable.
- Cotswold – Not my favourite cheese unfortunately. I flavoured it with dried chives and dried onion flakes, but the actual cheese itself didn’t appeal to me. Not sure why. Sometimes you just don’t like something
- Raw Milk Cheddar – This is the cheese I am most excited about, yet at the same time a little anxious. It’s been ageing in the cheese cave for almost 6 months with no external signs of any problems. The plan is to try it in a couple of weeks, then again at 9 and 12 months. All going well I may even age a wedge even longer. Dependent upon the outcome with this cheese, I intend to make more raw milk hard cheeses.
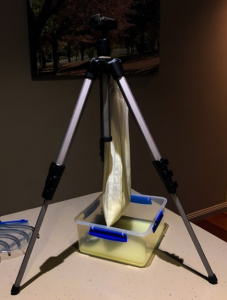
- Labneh – Very easy to make this lovely soft cheese if you use store bought yoghurt. I use Jalna Pot Set Greek Style Yoghurt and it’s delicious. Top it with some Dukkha and/or good quality infused Olive Oil and you have a great dip.

- Cotswold
- Labneh draining
- Smoked Colby & Raw milk Cheddar

- Boursin – Easy to make soft cheese that is a great vehicle for other flavours. I used pureed roasted garlic, dried chives, dried onion flakes and salt.
I think the most rewarding aspect of home cheesemaking is seeing the pleasure a well-made cheese gives others. That’s not to say I don’t enjoy eating it myself!
The biggest challenges I have had to date are:
- Sourcing good quality unhomogenised milk when I need it and in the quantities I need.
- Maintaining relative humidity at the desired level in my cheese maturation fridge (Hisense HR6WC58 Dual-zone wine fridge) is always challenging. Where appropriate I use individual ripening containers but it’s not the most efficient use of space unfortunately.
- Initially, the expense in buying cultures, moulds, the cheese fridges and manifold other equipment is quite high.
- Time, time and time! Even though I am retired, it’s still difficult to find the contiguous block of time required to make the more complex cheeses. By the time you sanitise the environment and all the equipment, set up all the gear and then clean up afterwards, it’s a significant time commitment that often spills over into the next day.
The cheeses I most enjoy making is cheddar closely followed by Camembert. In general though, I much prefer to make hard cheese despite it usually having a long maturation time.
I have always had some form of store-bought cheese on hand, usually a Mainland brand Tasty Cheddar (aged 12 months) and a Perfect Italiano brand Parmesan. As a treat I also enjoy Mersey Valley brand Pickled Onion cheese. I also buy small amounts of the best quality style of cheese that I intend to make so as I have a “taste benchmark”.
The best advice I can give to anyone considering home cheesemaking is to try to attend a cheesemaking course first. It’s a great introduction and doesn’t generally require you to buy any equipment. I found Graham Redhead’s 2-day Cheesemaking Workshop invaluable and would recommend it to anyone wanting a great introduction to the process and a glimpse of the science behind it. Also, there are many Cheesemaking books available, but I would recommend that you try to buy a book that uses metric measures. Many books published for the American market use US or imperial measures and frankly it’s a pain to accurately make the conversion if you intend to follow any of the recipes.
Having said that, if you only intend to use the book as a knowledge source this won’t be an issue. A few of my favourite books are:
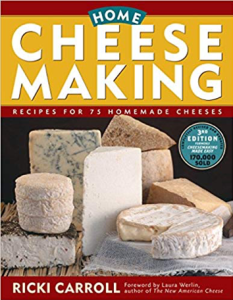
- Home Cheesemaking by Ricki Carroll. This book uses US measures unfortunately, but there is a lot of other very useful information.
- Mastering Artisan Cheesemaking by Gianaclis Caldwell. This book shows both US and metric measures in all the recipes as well as a lot of other general and technical-ish information.
Following is a list of cheeses that I intend to make over the next 12 months or so. They include:
Brick
Edam
Camembert (regularly)
Parmesan (again)
Stilton (again)
Red Leicester
Tomme (hopefully natural rind)
Gouda
Haloumi
Asiago Vercchio
Asiago d’Allevo
Provolone Dolce
Emmental
Gruyere
Gorgonzola Dolce
Here is my STILTON style cheese recipe
Prepare Blue Mould
Add ¼ ‘drop’ spoon, or the tip of a skewer, of blue mould spores to approximately 100ml of milk warmed to 30° C. Stir in well and allow approximately 30 minutes for the spores to rehydrate. This is enough for 10 litres of milk so you will only use 80ml of this solution later in the process.
Milk
Warm 8 litres of non-homogenised full cream milk and 500ml of cream to 30° C. As usual, do not use thickened cream, it must be pure cream.
Calcium Chloride
Add ¼ teaspoon (or 1.25ml) of Calcium Chloride diluted in ¼ of a cup non-chlorinated water to the milk
Starter Cultures
Add approximately 1 ‘Dash’ spoon of M235 (mesophile) and 1 x ‘Tad’ of MA315 (thermophile) starter to 8 litres of milk. Allow 5 minutes for rehydration and then stir in well using a gentle top to bottom motion.
Add Blue Mould solution
Add approximately 80ml of the Blue Mould/Milk solution to the cheese milk and stir well for 1 minute. Discard the remaining 20ml.
Ripen
Cover and allow to ripen for 30 minutes. Maintain temperature.
Rennet
Add ¼ teaspoon of liquid Rennet diluted in ¼ of a cup of non-chlorinated water to the milk. Stir in a gentle top to bottom motion for 2 minutes. Leave milk still for 90 minutes. Maintain temperature.
Check curd set
Check for a “clean break”. If the curd is not firm enough, leave for a further 5 minutes and check again.
Rest curd
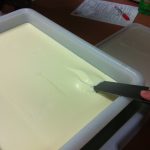
Line a large stainless steel colander with sanitised cheese cloth and place it into a large bowl. The size of the bowl needs to be such that it allows the curds to sit in the whey as it drains from the curd. Ladle or gently pour the curds and whey into the lined colander. Let the curds sit in the warm whey for 90 minutes. Try to maintain the temperature of the whey if possible.
Drain curd
Lift the curds out of the colander (still in the cheesecloth) and hang them to drain for a further 30 minutes.
Press curd
Place the bag of curds on sanitised cheese board on a draining tray. Place a second sanitised cheese board on top of the bag of curds. Place a 4 Kg weight on top. Allow to press overnight. Important: overnight temperature must be approximately 20 – 25°C (so keep in a warm place if it is a cool or cold night).
Day 2
Mill cheese
Place curds in a large sanitised bowl and roughly break up the curds into 12mm to 18mm chunks with fingers. Mix in 2 tablespoons of non-iodised salt.
Hoop cheese
Place a cheese mat on a sanitised cheese board, place mould/s on the cheese mat and fill with the curd. Place a second sanitised cheese mat, then a second sanitised cheese board on top of the mould/s.
Turning the mould
Rest curds for 15 minutes, then invert the mould/s. Invert the cheese mould/s every 15 minutes for 2 Hours.
Rest in mould
Let rest in mould overnight. Important: overnight temperature must be greater than 20 – 25°C (so keep in a warm place if it is a cool or cold night).
Days 3 to 6
Flip cheese
Invert the cheese several times a day over the next four days, and then remove from the mould. Carefully smooth the cheese surface with a pallet knife to prevent future cracking and undesirable mould growth.
Pierce cheese
On day six, using a sanitised rod with a 1.5 to 2mm diameter, carefully poke 25 to 30 holes from the top to the bottom of the cheese. This will allow air to enter the cheese and hence promote the internal growth of blue mould. Be careful not to make the holes too close to the edge of the cheese as it may cause cracking.
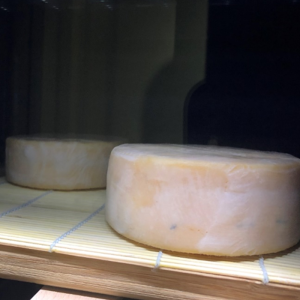
Age Cheese
Age cheese at 10 to 12° C and 90% humidity. Turn the cheese several times a week. Consider using a ripening container to maintain humidity (as done with Camembert). Remember to regularly remove excess whey and any condensation, especially on the lid, to stop it dripping onto the cheese.
Maintain Cheese
The cheese will develop a blue to blue green surface mould during aging. This usually commences after 7 to 10 days. As time progresses it will also develop a reddish-brown smear (slime). Scrape off the mould and smear once a week. Age cheese for 12 – 14 weeks.